Zhongwang cad skills sharing: new features of annotation function
I have used the domestic Zhongwang CAD software for some time. I found that the annotation function in the 2009 version of Zhongwang CAD has improved a lot compared with the previous version of CAD 2008i. Some of the bugs we used to find before have been solved. Refer to Autocad to improve the functionality of the annotation. The following is mainly to look at the annotations of Zhongwang 2009. Compared with the previous version, CAD2008i has new features.
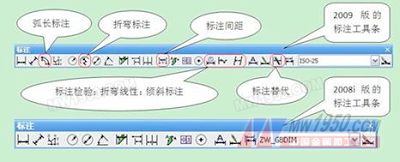
As you can see from the figure below: In the 2009 version, the labeling toolbar has added arc length labels, bend labels, label spacing, inspection, and folding. Bend linear, tilt, substitute and other function buttons.

Let's take a look at the usefulness of these new features.
Arc length labeling: This function is actually available in the Zhongwang CAD2008i version, specifically in the extended tool menu labeling tool, but not listed in the labeling toolbar, and the actual marked form is not very intuitive. The 2009 version has already made relevant improvements, and the performance of the annotations is consistent with the performance of AutoCAD2008.
Bend label: The bend label is also the bend radius label. It can also be called the scaled radius label. You can specify the center position as the origin of the label at any position instead of the center of the circle or arc in the radius label. point. In some drawings, you need to label a large arc. The center of the large arc is sometimes outside the drawing, and the bend is used. Bend labels can additionally specify a point instead of the center of the circle.
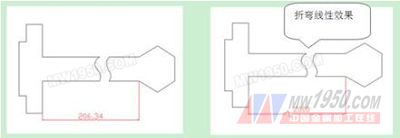
Bend linearity: Sometimes the value we need to mark is very large, even beyond the scope of the drawing, but we have to mark it in the drawing, then the value of the label is not the measured value. In general, the displayed label value is greater than the actual measured value of the label. We can use the bend linear notation to represent. For example, as shown in the figure below, the parts in the figure are 2000 units, but my drawings can't be drawn so long, then they are represented by bends. The effect is shown in the right figure below:

Label spacing: In the labeling process, we tend to be neat and tidy. For linear or angular labels with parallel but overlapping or different spacing in the graph, we can use this function to separate the labels by a fixed distance. Neat and beautiful.
However, it should be noted that when adjusting the spacing, the selected labels must be of the same type, for example, the same as linear labels or the same angle labels. In addition, these labels must also be parallel or have the same origin and are in the size of each other. The extension of the line. If you specify a spacing value of 0 when adjusting the spacing, you can align the selected linear and angular labels at the dimension line. If the specified spacing is Auto, the label spacing will be twice the height of the dimension text.
Tilt: With this function we can implement some special annotations to tilt the original label. We still analyze it through specific examples. In a picture, most of the dimension lines of the labels are horizontal and vertical, and the small part is oblique. As shown in the left figure of the figure below, if you want the marking lines of the whole picture to be unified horizontally and vertically, Then we can use the label tilt command to tilt the two labels on the left.

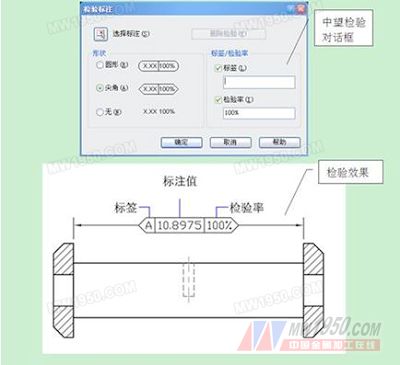
Label inspection: Inspection labels allow the user to effectively communicate the frequency of inspections of manufactured parts to ensure that the label values ​​and part tolerances are within the specified range. When you use components that must meet the specified tolerance or label value before they are installed in the final assembled product, you can use the inspection label to specify the frequency of the test part.

You can add a test label to any type of label object; the test label consists of a border and a literal value. The border of the inspection label consists of two parallel lines with a round or square end. Text values ​​are separated by vertical lines. Inspection labels can contain up to three different information fields: inspection labels, label values, and inspection rates.
From the improvement of the above-mentioned Zhongwang CAD2009, it can be seen that Zhongwang CAD software has made rapid progress and pays great attention to practical functions. This is one of the reasons why domestic software has been favored by more and more users in recent years.
For more information about Zhongwang CAD2009, please visit:
Http://
Wire Spring,Double Torsion Spring Design,Spring Steel Wire,Stainless Steel Spring Wire
OEM order and ODM order can is welcome
wire thickness : 0.07--5mm
applicaiton: viation,automotive, motorbike, bicycle, automatic equipment, household appliance, medical device ,toy, telecommunication,computer, instrument and meter,furniture, electric tools,mold and other industries
Wire Spring,Double Torsion Spring Design,Spring Steel Wire,Stainless Steel Spring Wire
Shenzhen Lanejoy Technology Co.,LTD , https://www.bbq-grillgrate.com